-
Shop
- Advanced Technologies
- AI Skills
- AI Skills Mastery 2026 Collection
- Bathroom
- Best-Sellers
- Car Accessories
- Confidence
- Dating & Social Skills
- Digital Resources
- AI & Technology
- Beauty
- Budgeting & Saving
- Car Buying & Ownership
- Electronics & Technology
- Entrepreneurship & Business Growth
- Financial Independence
- Financial Mindset & Psychology
- Goal Setting
- Home Styling & Organization
- Kitchen & Recipes
- Leadership
- Mindset
- Online Business
- Parenting & Child Development
- Personal Style & Fashion
- Pet Lifestyle & Wellness
- Positive Thinking
- Sleep Improvement
- Smart Life with AI
- Stress Management & Relaxation
- Wellness
- Yoga & Mind-Body Practices
- Education & Learning
- Family & Parenting
- Fashion
- Financial Education
- Furniture
- Gadgets
- Health & Beauty
- Health & Wellness
- Home & Garden
- Home Electronics
- Kids & Babies
- Kitchen
- Kitchen Best-Sellers
- Lighting
- Luxury Brands Collection
- Patio, Lawn & Garden
- Personal Growth
- Pet Care
- Pet Supplies
- Pets
- Sport & Outdoors
- Stress Relief & Relaxation
- Travel
- Travel & Adventure
- Wealth
- Popular
- Best deals
Portable Full HD Projector Setup Tips for Big-Screen Nights
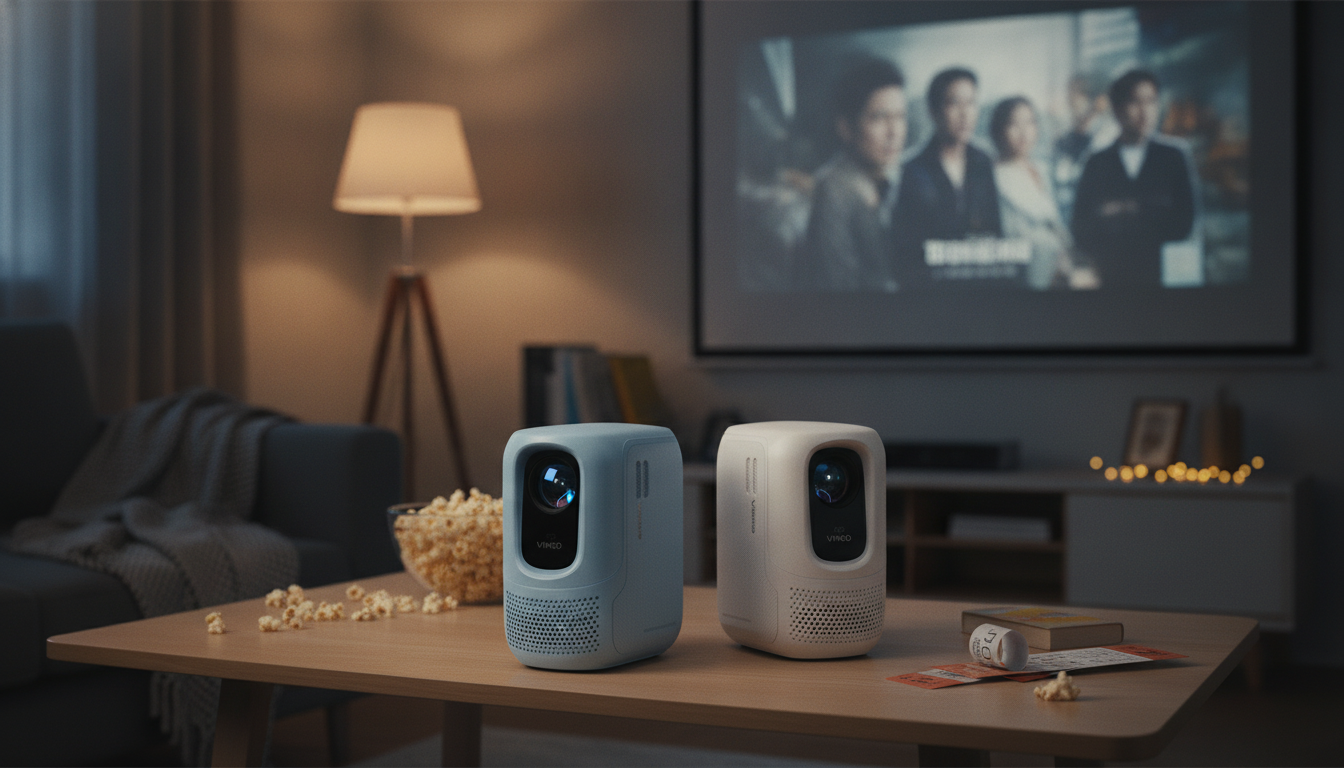
Mini Portable Full HD Projector: A Big-Screen Home Theater That Travels
A mini portable Full HD projector can turn a blank wall into movie night, game day, or a backyard screening—without dedicating a room to a TV. The best experience comes from balancing picture quality with real-world setup: where you place it, how you control light, what you connect, and how you handle sound. Below is a practical guide to getting a cinematic look at home while keeping things easy for travel and temporary spaces.
What makes a portable projector feel like a home theater
A “home theater” vibe isn’t just about making the image big. It’s about getting a clean, stable picture that stays comfortable for long sessions and still feels sharp when subtitles pop up or fast action hits the screen.
- Full HD (1080p) resolution helps preserve detail on larger image sizes—especially for text, menus, and subtitles.
- Consistent focus from center to corners matters more than many shoppers expect; soft corners can make the whole image feel less premium.
- Brightness that matches your room: darker rooms can go larger for immersion, while brighter rooms typically look better with tighter light control and a more moderate image size.
- Low-latency, stable input (often easiest via HDMI) is key for sports streams and casual gaming where timing and smoothness matter.
- Quiet operation and sensible heat output keep the projector from becoming the loudest thing in the room during a long movie.
For deeper standards and best practices around motion imaging, organizations like SMPTE are a helpful reference point for how professionals think about image presentation.
Set expectations: room light, screen size, and viewing distance
Portable projectors are at their best when the environment works with them. Even small adjustments—like turning off a lamp or moving the unit a few inches—can noticeably improve clarity and contrast.
- Darken the room for the most cinematic look. Ambient light is the fastest way to wash out blacks and reduce perceived contrast on big images.
- Match screen size to seating distance. Bigger isn’t always better if viewers are close enough to notice pixel structure or feel eye fatigue.
- Prioritize positioning over correction. A level, centered projector reduces the need for heavy keystone correction, which can soften the image.
- A matte-white wall works in a pinch, but a dedicated screen typically improves uniformity and perceived contrast.
- Plan cable routing early (power, HDMI, audio) so the setup stays safe, tidy, and easy to repeat.
Quick placement checklist for a clean, sharp image
| Step | What to do | Why it helps |
|---|---|---|
| Level the projector | Use a stable surface and keep the lens centered to the screen | Reduces keystone use and preserves sharpness |
| Control light | Close curtains, turn off nearby lamps, avoid bright ceilings | Improves contrast and black levels |
| Dial in focus | Focus on subtitles near corners, not only the center | Ensures uniform clarity across the image |
| Choose a screen surface | Use a screen or smooth matte wall | Better brightness uniformity and fewer texture artifacts |
| Optimize sound | Place speakers toward viewers or connect external audio | Clear dialogue and stronger bass impact |
Connectivity that keeps movie night simple
A portable projector feels “effortless” when connecting your favorite sources takes seconds, not troubleshooting. For most setups, HDMI is the most dependable backbone: it’s widely supported and tends to minimize lag and dropouts.
- HDMI support makes it easy to use streaming sticks, game consoles, Blu-ray players, and laptops. For an overview of what HDMI standards are designed to support, see the HDMI Licensing Administrator.
- Wireless casting can be convenient for quick clips and casual playback, but wired options are usually better for smooth sports and gaming.
- Audio outputs (Bluetooth or 3.5 mm) make it simpler to pair with speakers or a soundbar when built-in audio isn’t enough.
- USB playback is useful for offline content during travel, cabins, or anywhere Wi-Fi is unreliable.
- Power planning matters: think through where outlets are in your living room, bedroom, patio, or travel setup before you commit to a “permanent” spot.
Sound: built-in audio vs. external speakers
Portable projectors often shine visually, but audio is where many setups level up fast with a small add-on speaker or soundbar.
For background on home audio formats and setup concepts, Dolby provides helpful explanations of how audio technologies aim to improve clarity and immersion.
Everyday setup tips for a sharper, more comfortable image
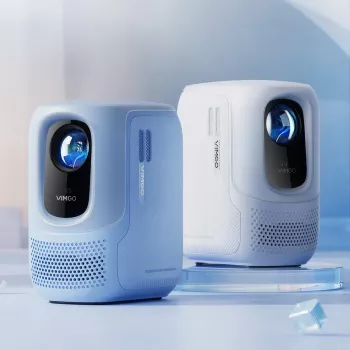
Product spotlight: Mini Portable Full HD Projector
Mini Portable Full HD Projector: Your Ultimate Home Theater Experience
At-a-glance details
| Item | Details |
|---|---|
| Product | Mini Portable Full HD Projector: Your Ultimate Home Theater Experience |
| Price | $433.47 USD |
| Availability | In stock |
| Product page | https://exellene.com/mini-portable-full-hd-projector-your-ultimate-home-theater-experience/ |
A smart add-on for travelers who take entertainment on the road
The Smart Bundle to Avoid Travel Scams: 3-in-1 Digital Guide, Checklist & AI Tools
Who this style of projector is best for
FAQ
Is a portable Full HD projector good enough to replace a TV?
It can be for movie-first households and flexible spaces, especially in dim rooms. The main trade-offs are sensitivity to ambient light, a bit more setup time than a TV, and the possibility of needing external audio for a fuller experience.
How do you get the sharpest picture from a portable projector?
Start with level placement and keep the lens centered to the screen so you can minimize keystone correction. Then fine-tune focus using corner subtitles, control room light, and use a smoother wall or dedicated screen for better uniformity.
Should you use built-in speakers or external audio?
Built-in speakers are convenient for quick viewing and smaller rooms. For a more cinematic impact, external speakers or a soundbar add clearer dialogue and stronger bass; wired audio is usually the most reliable if Bluetooth delay becomes noticeable.











Leave a comment